This is a quick guide on how to convert a Galaxian or Pacman PCB to run on DC. This will allow you to use a DC powersupply or connect the game board to a JAMMA setup. We will focus on a simple and efficient conversion that can be quickly reversed if needed.
Pictures provided are from a Pacman board. The procedure for Galaxian, parts impacted and their approximate position is pretty much the same.
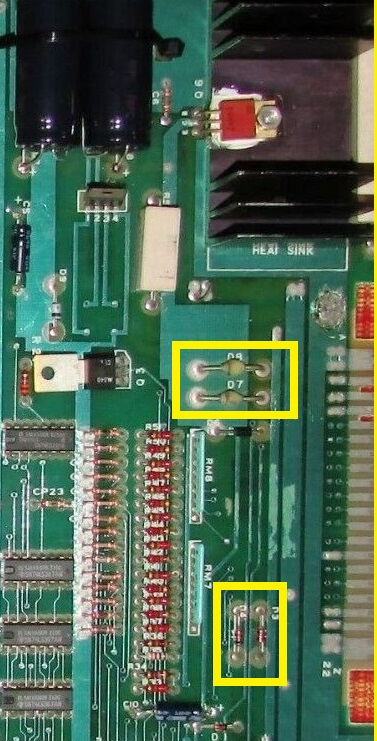
First locate the area that where you need to make changes on the PCB. This is the yellow box in the following picture:

Focusing on the area, locate the +5V and +12V rectification diodes. Image below shows their location.
Galaxian
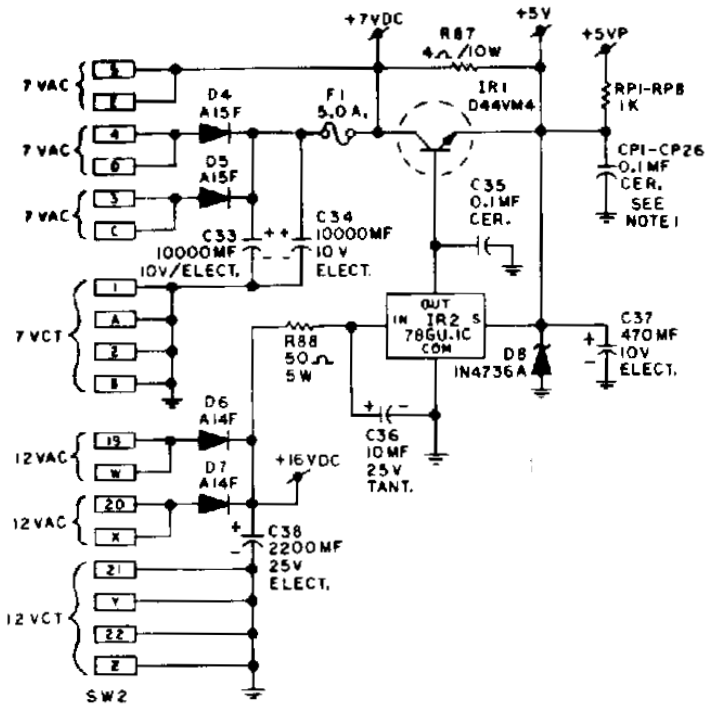
Put a wire link across or short the diodes:
- Diode D4 (A15)
- Diode D5 (A15)
- Diode D6 (A14)
- Diode D7 (A14)
The pinout of the board now becomes:
| SOLDER SIDE | PARTS SIDE |
|---|---|
| GND | GND |
| GND | GND |
| +12V | +12V |
| +12V | +12V |
| SPK+ | SPK- |
| VSYNC * | VBLUE * |
| VGREEN * | VRED * |
| GND | VGND |
| NC | TABLE |
| P2RIGHT | P2LEFT |
| P2B1 | P1B1 |
| P1RIGHT | P1LEFT |
| P2START | P1START |
| SVC | TEST |
| COIN2 | COIN1 |
| COUNT1 | NC |
| NC | NC |
| COINRET | NC |
| +5V | +5V |
| +5V | +5V |
| GND | GND |
| GND | GND |
Pacman
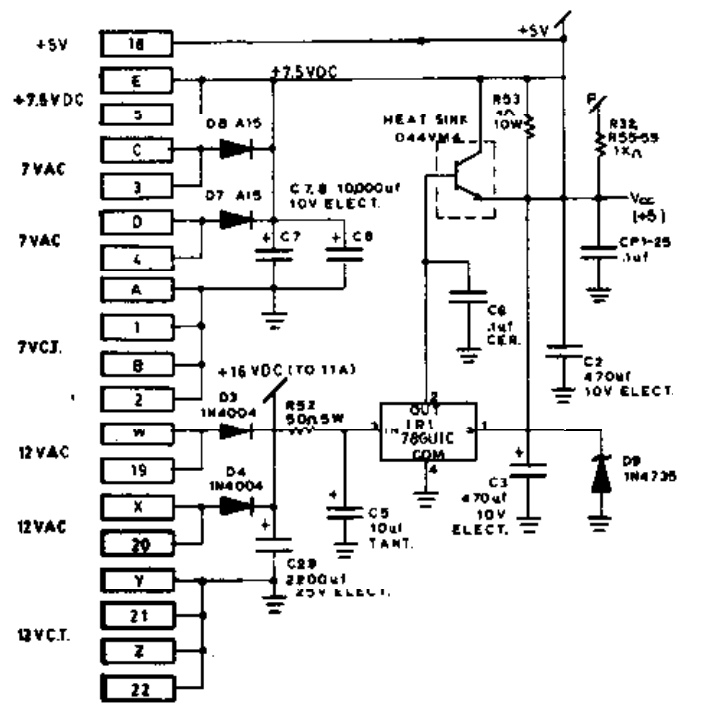
Put a wire link across or short the diodes:
- Diode D8 (A15)
- Diode D7 (A15)
- Diode D3 (1N40004)
- Diode D4 (1N40004)
The pinout of the board now becomes:
| SOLDER SIDE | PARTS SIDE |
|---|---|
| GND | GND |
| GND | GND |
| +12V | +12V |
| +12V | +12V |
| COINMUL* | P2DOWN |
| VSYNC | VBLUE |
| VGREEN | VRED |
| GND | VGND |
| P1DOWN | TABLE |
| P2RIGHT | P2LEFT |
| P2UP | P1UP |
| P1RIGHT | P1LEFT |
| P2START | P1START |
| SVC | TEST |
| COIN2 | COIN1 |
| COUNT1 | SPK-* |
| RSTCRD | SPK+* |
| COINRET | NC |
| +5V | +5V |
| +5V | +5V |
| GND | GND |
| GND | GND |
These steps are optional and are the same for both boards. These parts used for regulation which if using DC should now be handled by the external power supply.
- Remove or clip 2 legs from IR1, leaving ground intact (78GU I.C.)
- Remove (D44VM4 transistor)
- Remove R52 (50Ohm 5W resistor)
- Remove R53 (4Ohm 10W resistor)