A number of people asked my for an easy to follow guide on how to add ROMs to the Retropie images on the PJ adapter. While there are many ways to do this as described in the Retropie documentation, I will outline here the fastest, easiest and most effective way to do this without much guessing or trial and error.
To start, you’ll need your image ready on an SD card and a USB drive for your ROMs. If you don’t have a USB drive you’ll unfortunately have to use one of the other methods here.
Here are the steps required:
- Format your USB key drive as FAT32. Make sure it is at least as big as the ROM set you are trying to install.
- Extract this zipfile to the root of the USB drive.
- You should have retropie as your only folder in the drive, and a bunch of directories under /retropie/roms/. Here’s what you should see when you go to the retropie/roms folder:
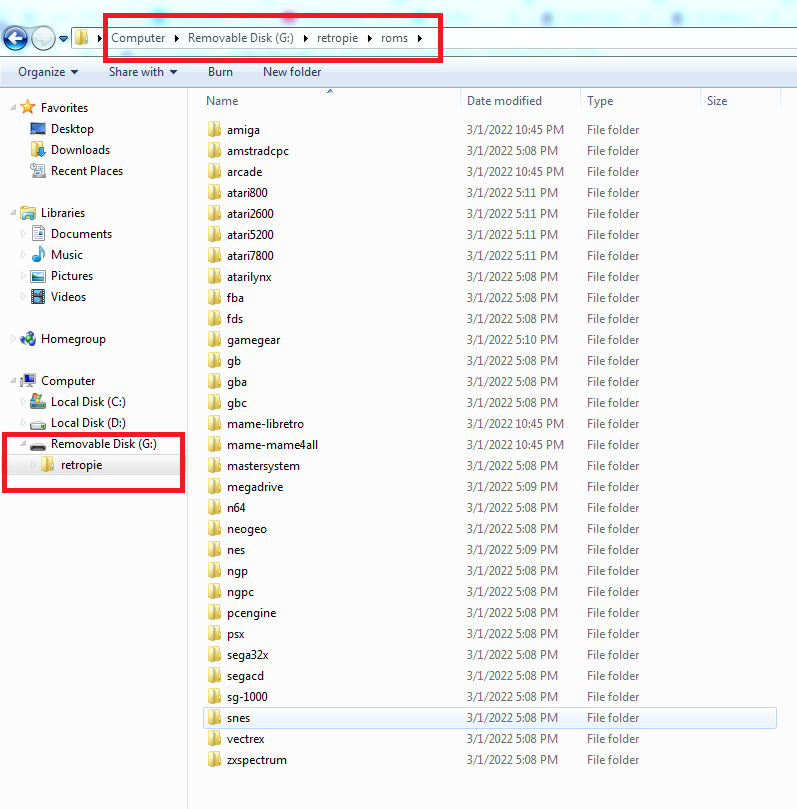
- Put your ROMs in the appropriate folder. For example, Super Nintendo ROMs should go into the snes directory, full path /retropie/roms/snes. Same goes for any other console or platform you wish to emulate.
- For MAME ROMs, the process is similar but there is a bit more flexibility in terms of where the ROMs can go.
- Putting ROMs in the arcade directory will allow you to select all ROMs from one menu (Arcade) but you will need to select the emulator (mame4all, mame-libretro, fba) when the game is first launched.
- Putting ROMs in the fba, mame-libretro, or mame-mame4all folder will launch the appropriate emulator. In my opinion, mame-libretro provides the best experience and excellent compatibility, so this is where I usually put all my arcade ROMs.
- Make sure you have the correct ROM set version for the MAME version you want to use:
- mame4all – romset 0.37
- mame2000_libretro is romset 0.37
- mame2003_libretro is romset 0.78 (default in vanilla retroPie 4.5.1 and 4.7.1)
- mame2010_libretro is romset 0.139
- mame2014_libretro is romset 0.159
- Eject the USB stick and insert it into you RaspberryPi’s USB port (doesn’t matter which). Let the Pi boot up with the stick inserted. Wait until the ROMs have all been copied over to the SD card on the Pi. This may take a long time depending on the amount of ROMs.
- Power down the Pi / PJ Adapter and remove the USB drive. You can use the USB drive to add more ROMs later if needed.